Adobe Acrobat DC has a built-in accessibility checker to help you make sure the PDFs you have created or get from others meet accessibility guidelines. While no automated checker will catch everything, this is a simple and convenient way to find and fix some of the most common issues with PDFs.
Using Acrobat’s accessibility checker
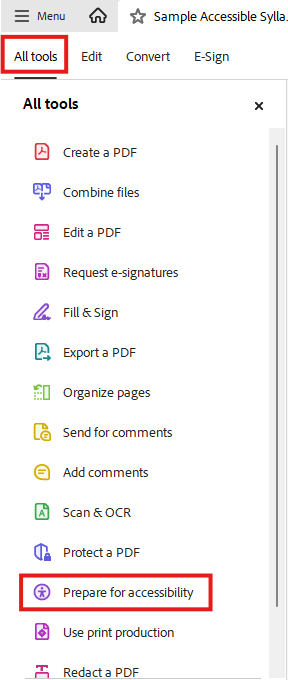
To use the accessibility checker, open the All Tools menu and click on the Prepare for accessibility option.
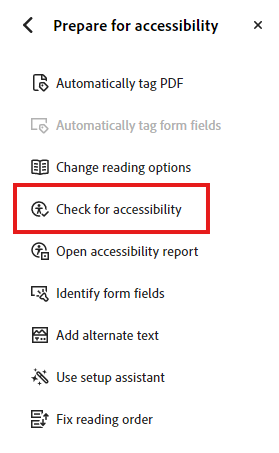
From the Prepare for accessibility options, choose Check for accessibility.
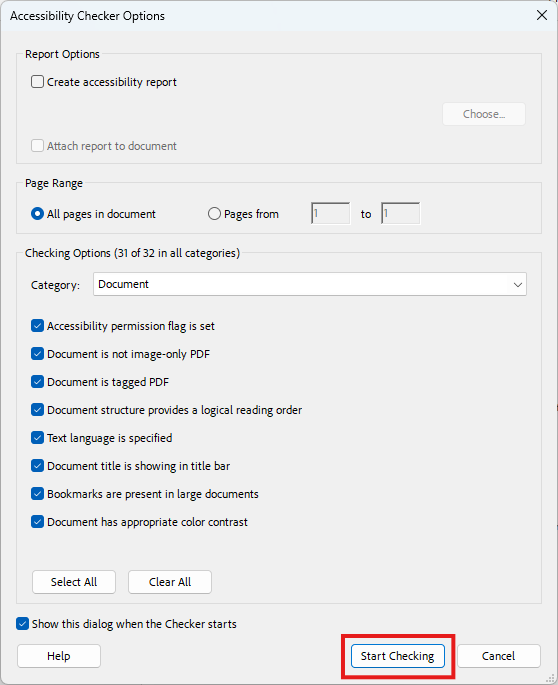
Acrobat will present a number of options for the accessibility checker. You can leave all of these set to their default, and click the Start Checking button.
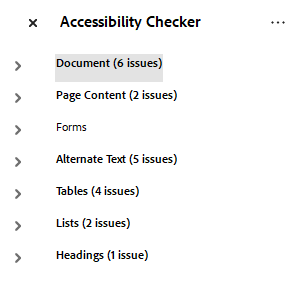
Acrobat will think for a moment and then open a pane on the right side of the window showing the results of the check.
Acrobat cannot check everything automatically, so there will always be at least two items flagged with question marks. If these are the only issues you see with your document, there’s a good chance that you’re good to go! This is a document that is properly tagged for accessibility, has alt text on all images, and should be compatible with assistive technology. You should manually check the two items that have question marks, of course.
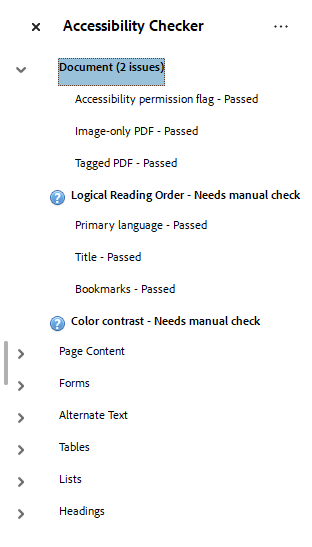
Manual check 1: Color contrast
Colors for the document should have been chosen so that text is easily distinguishable against the background. Simply skim through the document to verify that there aren’t any odd color choices. For most text documents that use black text on a white background, this should be very easy. If you do see any odd color choices, these cannot be corrected within Acrobat, and you will need to adjust the original document or, if possible, contact the creator of the document to make any necessary changes.
Manual check 2: Logical reading order
This check makes sure that when assistive technology processes the PDF, it reads all the elements of the page in the correct order. While for many primarily text-based documents written in English, this is very simple (top to bottom, left to right), some design applications will build the reading order based on when elements were placed on a page. In these cases, you may find that assistive technology will jump around the page in unexpected ways rather than in a pattern that makes sense to the reader.
You may have noticed a Fix reading order option in the accessibility tools pane noted above. Unfortunately, this is not the best option to use (it’s a holdover from earlier versions of Acrobat and assistive technology) and can be ignored for our purposes.
Instead, start by right-clicking on the right-side toolbar of the Acrobat window and make sure that the Accessibility tags button is enabled. When it is, you should see the tag icon appear in the toolbar.
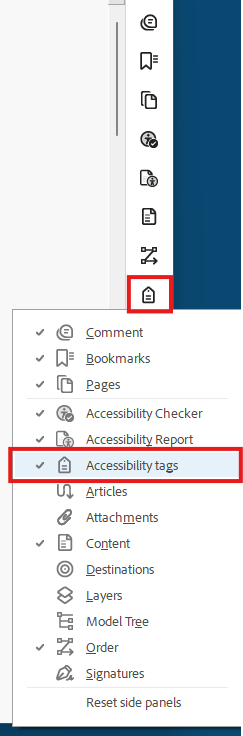
When you click on the Accessibility tags icon, the Accessibility tags pane will open on the right side of your document. These tags are what modern assistive technology uses to read a document. If there aren’t any tags shown in this pane, the document will appear as empty or blank to assistive technology.
Assuming your document is tagged: If you click on one of the tags, you will see one or more items (depending on whether there are child items underneath the tag you selected) in the document become highlighted with a purple box.
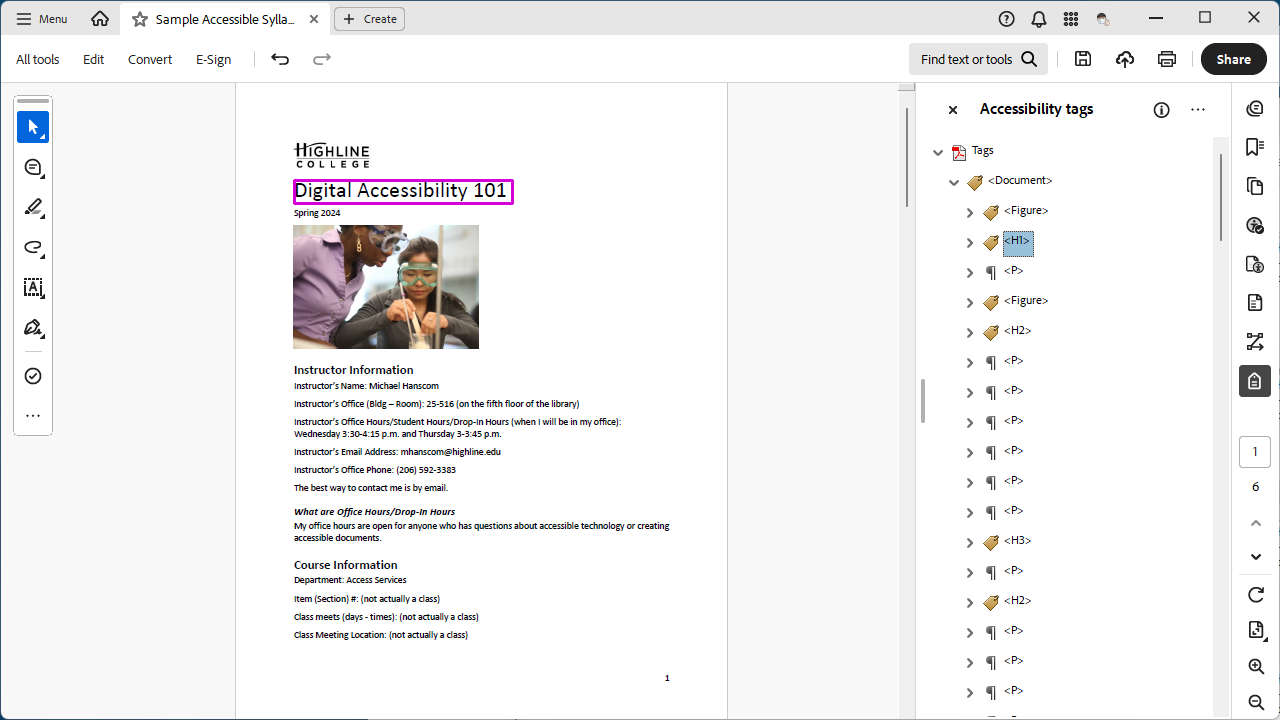
Checking the reading order is simply a matter of clicking on the tag at the top of the tag tree, then the next tag down, and then the next tag down, and making sure that the tags move through the document in a way that makes sense. It’s often faster to use the up and down arrow keys on your keyboard to move up and down the tag tree instead of clicking on each tag in turn.
If the reading order of the document makes sense as you move through the tag tree, then you’ve passed this check as well, and your document is ready to go. If the reading order bounces around in a way that doesn’t make sense, you can drag the tags up and down in the tag tree until the reading order is correct.
You may notice that there are different tags for different parts of the document in the screenshot above. Some lines are tagged H1, H2, or H3, some are tagged P, and some are tagged Figure. These correspond to heading levels, paragraphs, and images, and are how assistive technology like a screen reader knows how announce items and let users navigate within a document. If you’re starting to suspect that there’s a lot more you could learn about Acrobat tags, you’re very correct! That’s beyond the scope of this tutorial, but more tutorials will be available.
If there are more errors
You may have some PDFs that are tagged for accessibility, but still return errors. In this case, you can open the errors that the accessibility checker flags and right-click on the errors to see if it’s something that Acrobat can help you fix, or if it is something that needs to be fixed in the original document. In this example, the PDF has a few errors, and the currently selected error is an image without alt text showing the right-click context menu with options to fix the problem.
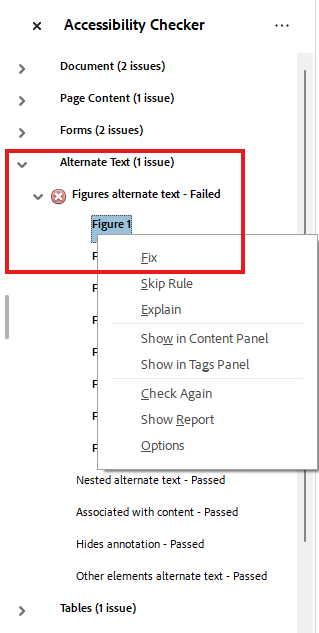
Some of what you’ll find here will be an easy fix (like adding alt text to images), but some gets very complex (like adjusting tables or forms). If you find yourself getting confused or frustrated, you can always contact me for assistance or simply submit the PDF for remediation.
If there are a lot of errors
If you run the accessibility checker and see a lot of errors pop up, the document is inaccessible. This example is of a document that was scanned and is only a series of images, with no selectable text and no accessibility tags. If you were to open the Accessibility tags pane for this document, it would be entirely empty. In this case, my recommendation is that you submit the PDF for remediation.